
A seam guide is a vital tool on sewing machines, helping sewists achieve straight, accurate seams. It enhances precision, speed, and professional results, making it essential for all projects.
1.1 What is a Seam Guide?
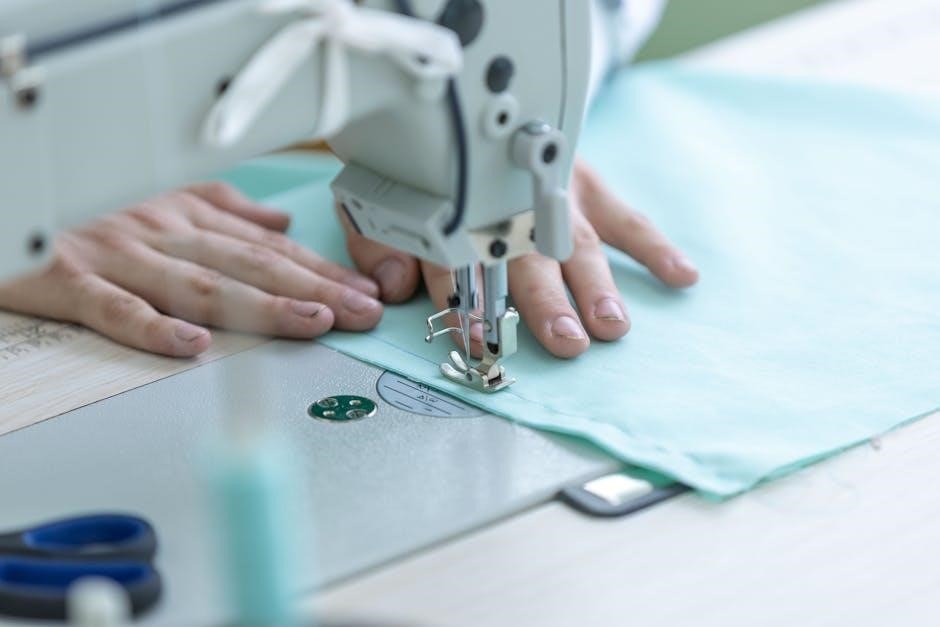
A seam guide is a tool or marking on a sewing machine that helps sewists maintain straight, consistent seams. Typically located on the throat plate, it provides a reference for aligning fabric edges. It can be a magnetic attachment or built-in markings, ensuring accurate stitching. By guiding the fabric edge along the seam guide, users achieve precise seam allowances, preventing uneven stitching. This essential feature is adjustable, catering to various fabric types and project requirements, making it indispensable for both beginners and professionals seeking professional-looking results.
1.2 Importance of Using a Seam Guide
Using a seam guide ensures precision and consistency in sewing, helping to maintain straight seams and accurate stitch alignment. It saves time by reducing errors and the need for re-sewing. The guide enhances fabric control, especially on slippery or thick materials, and helps in achieving uniform seam allowances. This tool is particularly beneficial for beginners, as it builds confidence and skill. Experienced sewists also rely on it for professional-looking results. By minimizing mistakes, the seam guide streamlines the sewing process, making it an indispensable asset for projects requiring accuracy and a polished finish.
1.3 Brief History of Seam Guides in Sewing Machines
The seam guide has evolved alongside sewing machines, originating as simple alignment marks on early models. In the mid-20th century, detachable guides became common, offering versatility. Modern machines feature advanced seam guides, including magnetic versions, for enhanced accuracy. These tools have transitioned from basic aids to sophisticated accessories, reflecting the demand for precision in sewing. Their development mirrors advancements in sewing technology, ensuring they remain essential for achieving professional results. Today, seam guides are integral to sewing efficiency, catering to both novice and expert sewists alike.

Understanding the Components of a Sewing Machine Related to the Seam Guide
The seam guide works in harmony with the throat plate and needle plate, which feature markings for alignment and seam allowances, ensuring precise fabric guidance during stitching.
2.1 Throat Plate and Its Role
The throat plate, often featuring markings for seam allowances, plays a crucial role in guiding fabric during sewing. It works in tandem with the seam guide to ensure straight, consistent stitching. Professional tailors rely on its precision to align fabric edges effortlessly, maintaining uniform seam allowances. The plate’s design supports smooth fabric movement, preventing slippage and enhancing overall stitching quality. By understanding its function, sewists can better utilize the seam guide for professional-looking results, as highlighted in guides for machines like the Singer Promise sewing machine.
2.2 Needle Plate and Seam Allowance Guides
The needle plate, often referred to as the throat plate, features markings that serve as seam allowance guides. These guides help align fabric edges accurately, ensuring consistent seam widths. They are especially useful for maintaining uniformity in straight stitching. The seam allowance guides are integral to achieving professional-looking results, as they prevent fabric slippage and promote precise stitching. By utilizing these markings, sewists can easily follow patterns and maintain even seam allowances, enhancing the overall quality of their work. This feature is particularly beneficial for beginners learning to sew straight lines with precision.
2.3 Other Key Parts of a Sewing Machine
Beyond the seam guide, a sewing machine features several essential components that enhance its functionality. The bobbin holds the underside thread, ensuring smooth stitching, while the presser foot applies pressure to keep fabric steady. Tension dials regulate thread tightness, preventing uneven stitches. The handwheel allows manual control for precise fabric movement, especially in tight spaces. These parts work together to ensure accurate and efficient sewing, complementing the seam guide’s role in achieving straight, professional seams. Understanding and maintaining these elements is crucial for optimal machine performance and high-quality results in various sewing projects.
How to Use the Seam Guide for Straight Seams
Align fabric edges with the seam guide, set the correct allowance, and maintain steady movement for precise, straight stitching. This ensures professional-looking results every time.
3.1 Aligning Fabric with the Seam Guide
Aligning fabric with the seam guide ensures straight, consistent stitching. Position the fabric edge against the guide, keeping it straight and steady. This helps maintain accuracy and prevents deviations. By aligning properly, you achieve professional-looking seams with ease. The seam guide acts as a visual reference, making it simpler to sew straight lines. For best results, keep the fabric taut but not stretched. This technique is especially useful for beginners, as it helps build confidence and improves sewing precision. Proper alignment is the foundation for achieving flawless, professional-grade seams every time.
3.2 Setting the Correct Seam Allowance
Setting the correct seam allowance is crucial for achieving professional results. The seam allowance is the distance between the edge of the fabric and the stitching line. Most patterns specify a standard allowance, such as 1/4 inch or 1/2 inch. Use the seam guide to maintain this measurement consistently. Align the fabric edge with the appropriate mark on the guide to ensure accuracy. Adjusting the seam allowance correctly prevents gaps or puckering in the finished project. Always test the allowance on scrap fabric before sewing to confirm it matches your pattern requirements.
3.3 Maintaining Accuracy While Sewing
Maintaining accuracy while sewing is essential for professional results. Use the seam guide to keep the fabric aligned consistently, ensuring straight stitching. Keep the fabric taut but not stretched, and avoid pulling it while sewing. For precise control, use the edge of the seam guide as a visual reference. Magnetic seam guides can also help maintain accuracy by staying firmly in place. Test your settings on scrap fabric before sewing to ensure the guide is correctly positioned. Regularly check your stitches to avoid deviations, and adjust the guide as needed for different fabrics or stitch types.
Step-by-Step Guide to Inserting and Using a Seam Guide
Prepare your machine, insert the seam guide, align fabric edges, and adjust for accuracy. Sew straight lines with precision, ensuring professional results every time.
4.1 Preparing the Sewing Machine
Before using the seam guide, ensure your sewing machine is clean and free from debris. Remove any loose threads or lint, especially around the throat plate, to ensure smooth operation. Check the needle for damage and replace it if necessary. Thread the machine correctly, using the appropriate thread for your fabric type. Select the straight stitch option and adjust the tension settings as recommended. Finally, test the machine on scrap fabric to ensure proper function before starting your project.
4.2 Inserting the Seam Guide
To insert the seam guide, align it with the edge of the fabric, ensuring it fits securely into the designated slot on the throat plate. For magnetic guides, place them gently on the plate, ensuring they hold firmly. Adjust the guide to match your desired seam allowance, using the markings on the throat plate as a reference. Once in place, test the guide by sewing a straight line on scrap fabric to ensure accuracy. Proper alignment and secure placement are crucial for achieving straight, consistent seams throughout your project.
4.3 Adjusting the Seam Guide for Different Fabrics
Adjusting the seam guide for various fabrics ensures precise stitching. For heavier fabrics, move the guide farther from the needle to accommodate thickness. For stretchy or delicate fabrics, position it closer to maintain control. Magnetic seam guides can be easily slid into place, while fixed guides may require screw adjustments. Always test the guide on scrap fabric before sewing to ensure the correct seam allowance. This step ensures even stitching and prevents fabric slippage, making it essential for achieving professional results across different materials and projects.
Tips for Effective Use of the Seam Guide
Use the seam guide to improve accuracy and consistency. Align fabric edges carefully, test on scrap material, and adjust for different fabrics and stitch types.
5.1 Choosing the Right Seam Allowance
Choosing the right seam allowance is crucial for professional results. Common allowances range from 1/4 inch for quilting to 1/2 inch or more for general sewing. Always test on scrap fabric to ensure accuracy. Adjust the seam guide according to your pattern or project requirements. Proper alignment prevents puckering and ensures even stitching. For delicate fabrics, a narrower allowance may be necessary, while thicker materials might require a wider seam. Consistency is key to achieving flawless, professional-looking seams every time.
5.2 Using the Seam Guide for Various Stitch Types
The seam guide is versatile and works seamlessly with various stitch types, from straight stitches to zigzag and decorative patterns. For straight stitching, align the fabric edge with the guide for precise, even seams. When using zigzag or stretch stitches, adjust the guide to accommodate the wider stitch width. Decorative stitches benefit from consistent fabric alignment, ensuring intricate patterns are sewn accurately. Magnetic seam guides are particularly useful for maintaining steady control, especially on curved or angled seams. Experiment with different stitch types to see how the seam guide enhances your sewing machine’s performance and versatility.
5.3 Enhancing Sewing Speed with the Seam Guide
The seam guide significantly enhances sewing speed by reducing the need for constant adjustments. Magnetic guides can be quickly aligned, allowing for faster fabric positioning. Consistent alignment ensures smooth, uninterrupted stitching, saving time. For straight seams, the guide minimizes backtracking, while for curves, it maintains steady control. Experienced sewists can work more efficiently, completing projects faster. The guide streamlines the process, enabling quick transitions between stitch types and fabric edges. By maintaining accuracy, it reduces errors, allowing for faster completion of professional-looking results. Mastering the seam guide boosts overall sewing efficiency and speed.
Troubleshooting Common Issues with the Seam Guide
Identify uneven seams by checking guide alignment. Adjust the seam guide for accuracy and ensure proper fabric flow. Clean the throat plate regularly for smooth operation.
6.1 Dealing with Uneven Seams
Uneven seams often result from misaligned fabric or an improperly adjusted seam guide. To fix this, ensure the fabric edge aligns perfectly with the guide. Check the guide’s position and adjust it if necessary. If the issue persists, verify that the throat plate is clean and free of debris, as obstructions can disrupt fabric flow. Additionally, maintain consistent pressure on the fabric and sew at a steady pace to prevent wobbling. Regularly inspect and clean the sewing machine to ensure smooth operation and accurate stitching.
6.2 Adjusting the Seam Guide for Accuracy
Adjusting the seam guide ensures precise stitching and consistent seam allowances. Start by aligning the fabric edge with the guide, then gently move the guide left or right as needed. Use the screw or adjustment knob to secure it in place. Test the alignment by sewing a straight line on scrap fabric. If the stitches veer, tweak the guide slightly and retest. Regularly cleaning the throat plate and ensuring the guide is free from debris also improves accuracy. For optimal results, refer to your machine’s manual for specific adjustment instructions tailored to your model.
6.3 Solving Problems with Fabric Alignment
Fabric alignment issues can hinder sewing accuracy. To resolve this, ensure the fabric edge aligns perfectly with the seam guide. For uneven edges, use scissors or rotary cutters to trim excess material. Stretchy fabrics may require stabilizing with interfacing or using a walking foot. If fabric slips, apply temporary adhesive tape or use a magnetic seam guide for better grip. Always test alignment on scrap fabric before sewing your final project. Adjusting the guide slightly and maintaining steady fabric movement will help achieve straight, professional-looking seams every time.
Advanced Techniques Using the Seam Guide

Master advanced sewing techniques by using the seam guide for zippers, pockets, and perfect hems. Achieve professional results with precise alignment and straight stitching every time.
7.1 Sewing Perfect Straight Lines
Using a seam guide ensures perfectly straight lines by keeping fabric aligned with the needle. Magnetic guides are ideal for stability, allowing precise control. Start by positioning the fabric edge against the guide, then sew steadily. This technique is especially useful for beginners to achieve professional results. Regular practice enhances accuracy, making it easier to handle various fabrics and projects. Straight lines are foundational for sewing success, and the seam guide simplifies this process, ensuring every stitch is flawless and consistent.
7.2 Using the Seam Guide for Zippers and Pockets
The seam guide is invaluable for installing zippers and sewing pockets accurately. Align the zipper or pocket edge with the guide to ensure straight, consistent stitching. This tool helps maintain even spacing and prevents misalignment, especially when working with thick or slippery fabrics. By keeping the fabric steady, the seam guide allows for precise placement of zippers and pockets, resulting in a professional finish. It simplifies these often tricky tasks, making them accessible even for beginners, and ensures that every detail of your project looks polished and well-crafted.
7.3 Creating Professional-Looking Hems
Using a seam guide is essential for creating professional-looking hems. It helps maintain consistent folds and alignment, ensuring straight stitching. For perfect results, align the fabric edge with the guide and sew slowly. This tool is especially useful for wide or narrow hems, keeping the fabric steady and preventing wavy edges. By guiding the fabric accurately, it ensures a crisp, polished finish. Whether hemming garments, curtains, or home decor, the seam guide simplifies the process, delivering professional-quality results every time. It’s a must-have for achieving flawless hems with ease and precision.
Maintenance and Care of the Seam Guide
Regularly clean the throat plate and lubricate moving parts to ensure smooth operation. Store the seam guide properly to prevent damage and maintain its accuracy over time.
8.1 Cleaning the Throat Plate
Cleaning the throat plate is essential for maintaining your sewing machine’s performance. Use a soft brush or compressed air to remove lint, thread fragments, and debris. Gently wipe the surface with a dry cloth to prevent residue buildup. Avoid harsh chemicals, as they may damage the finish. Regular cleaning ensures smooth fabric flow and accurate seam guidance. For stubborn stains, dampen a cloth with distilled water, but avoid moisture near electrical components. Clean after each project to keep your machine in optimal condition and extend its lifespan. Consistent maintenance ensures precise stitching and professional results every time.
8.2 Lubricating the Sewing Machine
Lubricating your sewing machine is crucial for smooth operation and longevity. Use high-quality sewing machine oil, applying it to moving parts like the bobbin hook and gears. Avoid over-lubrication, as excess oil can attract dust and cause maintenance issues. Gently wipe away any drips with a clean cloth to prevent residue buildup. Regular lubrication ensures the machine runs quietly and efficiently, reducing wear on internal components. Always refer to your machine’s manual for specific lubrication points and recommendations. Proper lubrication keeps your machine in top condition, ensuring accurate stitching and seamless performance for years to come.
8.3 Storing the Seam Guide Properly
Proper storage of the seam guide ensures its accuracy and longevity. Store it in a protective case or pouch to prevent scratches or bends. Keep it separate from other tools to avoid damage. Place it in a dry, cool environment to prevent rust or corrosion. Avoid exposure to direct sunlight, as it may warp or degrade materials. Do not store it near heavy objects that could accidentally crush or misshape it. For convenience, store the seam guide in a designated compartment within your sewing machine’s case. This keeps it organized and easily accessible for future projects.
Expert Tips and Tricks for Using the Seam Guide
Use magnetic seam guides for precision and customize your guide for specific fabrics. Experiment with different stitch types to enhance versatility and achieve professional-looking results consistently.
9.1 Mastering the Use of Magnetic Seam Guides
Magnetic seam guides offer unparalleled precision by securely attaching to the throat plate. They allow for effortless alignment of fabric edges, ensuring straight, consistent seams. To master their use, position the guide according to your desired seam allowance, then align the fabric edge with the magnet. This tool is especially useful for thick or slippery fabrics. Regularly clean the magnetic surface to maintain its strength. By incorporating magnetic seam guides into your sewing routine, you can achieve professional-looking results with minimal effort and maximum accuracy.
9.2 Customizing Your Seam Guide
Customizing your seam guide enhances its functionality for specific projects. Use adhesive-backed magnets or removable tape to create adjustable markers. For unique seam allowances, mark measurements directly on the guide. This allows for precise alignment with various fabrics. Experiment with different materials, like metal or plastic, for durability. Tailor the guide to your sewing style by adding personalized markings or color-coding. Regularly update your customizations to suit new techniques or fabric types. This ensures your seam guide remains versatile and adaptable, improving accuracy and efficiency in every stitch.
9.3 Avoiding Common Mistakes
Avoiding common mistakes with your seam guide ensures consistent results. Always align fabric edges accurately and maintain steady movement. Incorrect seam allowance settings can lead to uneven stitching, so double-check measurements. Avoid placing the guide too far from the needle, as this reduces accuracy. Regularly clean and maintain the throat plate to prevent debris from affecting alignment. For magnetic guides, ensure the surface is metal and free from obstructions. By addressing these potential pitfalls, you can achieve professional-looking seams and enhance your sewing efficiency. Proper care and attention to detail are key to mastering the seam guide effectively.
Conclusion
Mastering the seam guide enhances sewing accuracy and efficiency, ensuring professional results. By following expert tips and techniques, sewists can achieve consistent, high-quality seams every time.
10.1 Summary of Key Points
The seam guide is an essential tool for achieving precise, professional-looking seams. It enhances accuracy, speed, and consistency in sewing projects. Proper alignment, fabric handling, and stitch selection are crucial for optimal results. Regular maintenance, such as cleaning and lubricating the machine, ensures the seam guide functions effectively. By mastering its use, sewists can tackle various fabrics and stitch types with confidence. Whether for straight lines, zippers, or hems, the seam guide is a versatile aid in elevating sewing skills. Its importance lies in its ability to streamline the sewing process and deliver flawless outcomes every time.
- Enhances sewing accuracy and efficiency.
- Works well with various fabrics and stitch types.
- Requires proper maintenance for optimal performance.
- Essential for achieving professional-looking results.
10.2 Final Thoughts on Mastering the Seam Guide
Mastering the seam guide unlocks a world of sewing precision and creativity. By consistently using this tool, sewists can achieve professional-looking results with ease. It not only saves time but also enhances the quality of every stitch. Whether working on straight lines, zippers, or intricate designs, the seam guide proves indispensable. With practice and patience, sewists can fully harness its potential, ensuring every project meets high standards. Embrace the seam guide as a trusted companion in your sewing journey, and enjoy the satisfaction of creating flawless, professional-grade garments and crafts.
Happy sewing!